This document serves as a guide to utilizing the workflow tools in Kerauno. These tools allow for an almost limitless customization of functionality within the Workflow elements of Kerauno.
The features being addressed in the workflow articles are Workflow Tags, Workflow Condition Configurations, Workflow Webhooks Configurations, Workflow Conditions, Workflow Webhooks, and Workflow Forms.
All of Kerauno's data engine utilizes Workflow Tags to create a standard set of data for each workflow solution. Tags can be updated in a call flow/workflow via workflow webhooks or workflow forms. The tagging system allows for dynamic sets of data to be collected actively and passively throughout the platform. The collected data supplies the necessary information for the Kerauno reporting engine. Workflow Tags and Components are also variables (cannot contain underscores) in the Presence Screen-Pop functionality.
Setting Up & Maintaining Workflow Tags
To modify/create workflow tags in your system, you must first have administrator permissions to the module. Workflow tags are accessed via the Kerauno Dashboard > Workflow Tools > Workflow Tags module. When logging in, depending on the version of Kerauno and any add-on packages you are using, there may already be pre-defined workflow tags in the system.
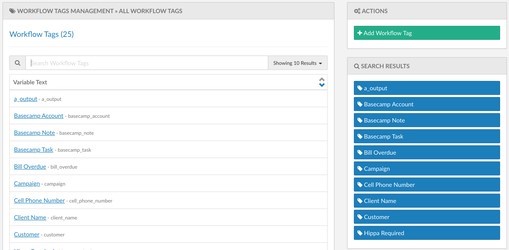
Navigate to the Kerauno Dashboard > Workflow Tools > Workflow Tags module of your system. Your dashboard may be empty but it could look similar to Figure 01 below.
 Figure 01: Workflow Tab WindowIn the top-right press the
 button.
You will be prompted to fill in three different inputs here:
- The Variable Name is the visual representation of the Workflow Tag throughout the entire platform.
- The Variable is the programmatic representation of the value in a workflow.
| NOTE: | This variable will be auto-populated based on the variable name; it is highly recommended this is used unless you are an experienced user of workflows. These variables will be used later in Workflow Conditions and Workflow Webhooks. |
- The Notes section is an internal identifier of free text the person building the workflow may use to keep notes on what this specific variable is doing in any given workflow or system integration.
Once you have filled out the form, click the button to add the new workflow tag to the system.
Congrats! You now have a functioning workflow tag in your Kerauno Workflow Platform.
How to Use Workflow Tags
Workflow Tags can be updated in many different parts of the Kerauno Workflow Platform. Outlined below are a few different places these tags can be updated:
- Workflow Conditions: Use Workflow Tags to determine the input compared to the conditional information.
- Workflow Webhooks: Use Workflow Tags to send input data from the agent to the webhook for use to then obtain input-based data.
- Workflow Forms: Utilize Workflow Tags by showing tagging data to the agent when a call is answered. Tags for a specific call can be set as well as dynamically modified when a user enters certain information into a Workflow Form. Using the tags within multi-form Workflow Forms allows data to be carried through from form to form.
Dragging & Dropping Workflow Tags in the Call Flow
You can drag-and-drop a Workflow Tag anywhere in a Kerauno Call Flow. These tags are statically updated based on the values assigned in the Call Flow tool.
To begin adding a Workflow Tag in a Call Flow, first navigate to the Kerauno Dashboard > Call Routing > Call Flow module.
In the right side of the Call Flow Tool there is an object called . Drag the selection anywhere in the Call Flow you would like to add it then drop the selected workflow tag to insert this new tag.
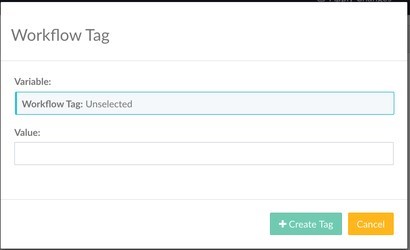
Once you've added the tag where you want it to be updated, you will be prompted with a form similar to Figure 02 below.
 Figure 02: Workflow Tag Screen
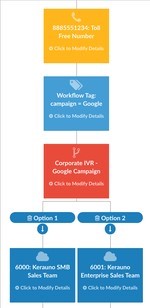
In this form, you will select the variable that you want and assign a value to it. In the example illustrated in Figure 03 below, the Campaign workflow tag is set on all calls coming from this number to Google. This way it can be used later in Kerauno Workflow Reporting.
 Figure 03: Workflow Tag
