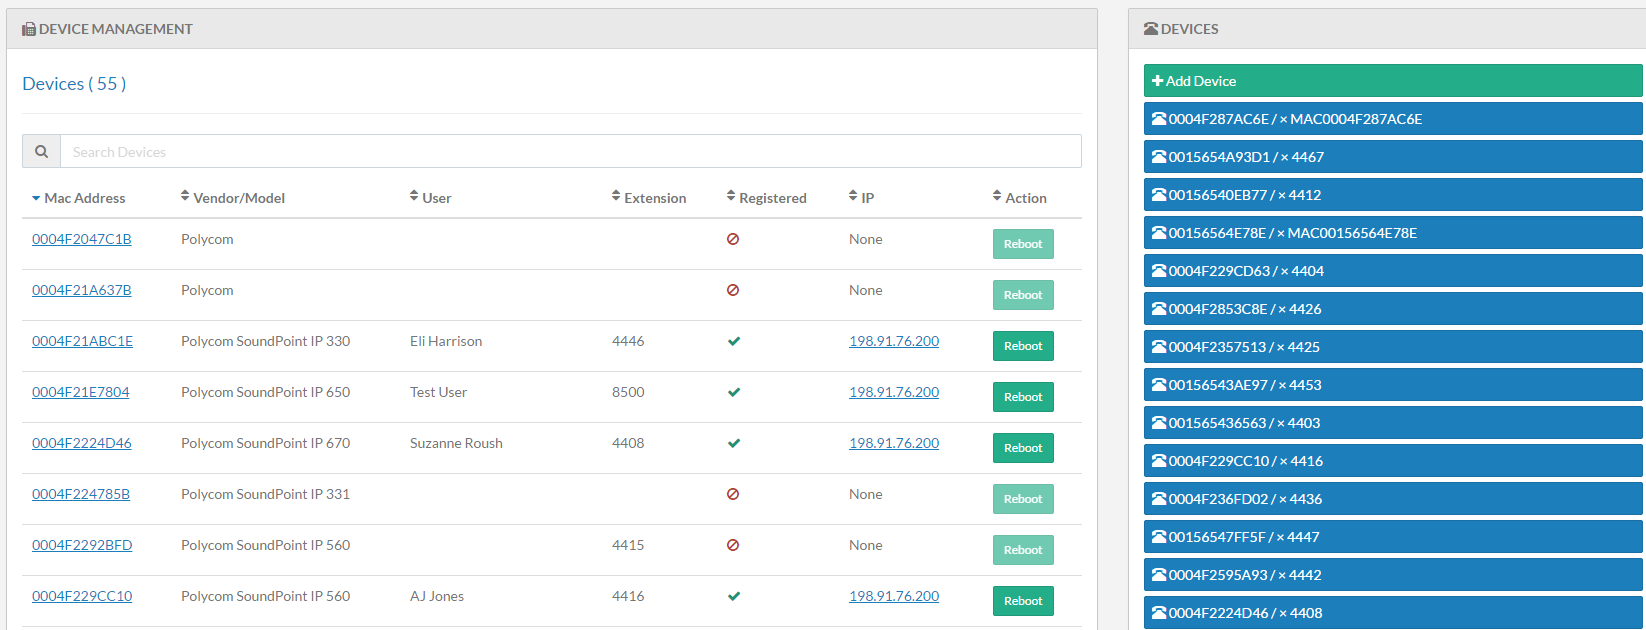
The Devices menu contains all relevant information about the devices connected to Kerauno. This includes information about the MAC Address of the device, the manufacturer and model of the device, the assigned user and extension, registration status, and IP address of the phone are displayed. This menu is also used to modify configurable keys on specific phone models. The option is also available to reboot one specific phone or reboot all phones configured to Kerauno.
The Devices menu allows System Administrators to view, manipulate, and troubleshoot any IP Phones or Paging Devices that are connected to Kerauno.
The Devices menu displays a list of every device that is connected to Kerauno.
 Figure 01: Devices Menu
A search bar at the top of the page next to the![]() symbol allows administrators to search for a device by MAC address, phone model, or extension. Select the
symbol allows administrators to search for a device by MAC address, phone model, or extension. Select the ![]() next to the header of any column to sort by the Registered column.
next to the header of any column to sort by the Registered column.
A device's registration status is characterized by a![]() or
or![]() symbol. A successfully registered device will display a
symbol. A successfully registered device will display a  symbol, while unregistered devices will show a
  symbol.
System Administrators also have the ability to reboot phones remotely using the green Reboot button in the far right hand column. This Reboot button is available for most Polycom SoundPoint Series and YeaLink phones. The option may be unavailable for older-model phones or generic brand IP Phones.
Kerauno allows administrators to modify the device settings and extension configuration for a specific phone via the Devices menu.
Click either the MAC address for the phone to be modified in the table, or select the phone from the blue device list on the right as shown in Figure 02 below.
 Figure 02: Devices Table
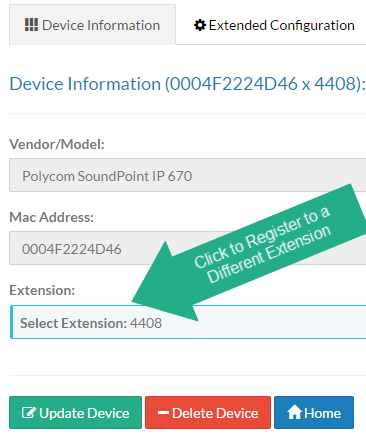
Once a specific device is selected, the Device Information page is displayed. This page shows the model, MAC Address, and currently assigned extension of the phone. On the Device Information page, System Administrators have the ability to re-register a phone to another extension. To do this, click the light-blue Extension button as shown in the Figure 03 to the right. A pop-up is displayed allowing the System Administrator to select the phone’s new extension. Mark the checkbox next to the desired extension to select it and click OK. Selecting Update Device reboots the selected phone and re-registers it with the new extension assigned. |
|
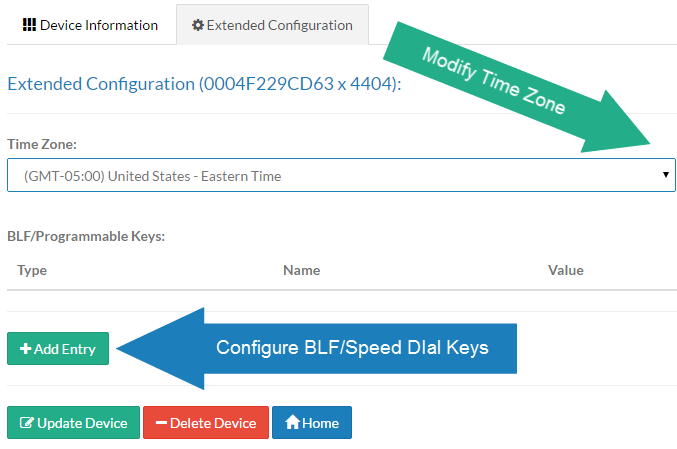
The Extended Configuration tab allows the modification of customizable keys on the phone and gives System Administrators the ability to change the time zone for employees dispersed geographically. The ability to modify customizable keys varies by model of phone, but can include "Soft" LCD keys, BLF keys, and Speed Dial buttons.
 Figure 04: Device Information Button Bar
The Unregister Device and Delete Device buttons are used to remove a device registration from Kerauno. The Delete Device button will completely remove the device from the Devices menu and Kerauno will no longer recognize the Device's MAC address. This button is used to clean up old phones that are listed in the interface but are no longer in use. The Unregister Device button strips whatever extension is assigned to the phone and initiates a reboot. Kerauno will still recognize the device's MAC address so the phone can be reassigned or moved elsewhere.
To modify the time zone setting on a specific phone, select the desired time zone from the drop-down menu. To alter the BLF or speed dial keys, click the + Add Entry button under the BLF/Programmable Keys heading.
 Figure 05: Device Information - Extended Configuration Tab
After selecting the +Add Entry button, the screen shows the types and settings available for the specific phone model that is selected. Press the Type of programmable key being configured.
Options include:
BLF (Busy Lamp Field): An LCD key typically on the far right-hand side of the phone. The LCD lights up green when the assigned extension is available; red when the assigned extension is on the phone.
Speed Dial: Button can be configured to instantly dial a telephone number, extension, or system code (such as *74 - Ring Group Log-in or *86 – Voicemail). Pressing this key will instantly call the configured destination.
Transfer: When set, instantly transfers the current call to the extension assigned. The transfer button may be configured to a specific extension. When the button is pressed, the current active call transfers to the set extension.
Parking Lot: Places a caller on Park, placing the caller into a Parking Slot.
 Figure 06: BLF/Programmable Keys Screen
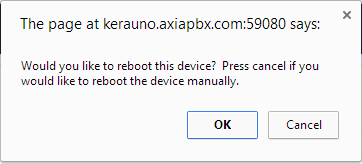
The Update Device button must be selected when any type of change is made to the configuration of a specific phone. When a type, name, and extension have been set, click the Update Device button in the bottom left-hand corner of the screen. A prompt is displayed allowing the selected phone to be rebooted remotely. When the Reboot Device prompt as illustrated in Figure 07 is displayed, click the OK button to reboot the phone. A typical reboot takes approximately five minutes, depending on make, model, and firmware of the phone. |
|
| NOTE: | On older phone models, the option to reboot via the interface may not be available. In these cases, make the modifications to the configuration in the interface and then reboot the phone manually by removing the power cord and then plugging it back into the phone. |


