Device Addresses
As of version 2020.04.1, a new field is available for all device configurations called "Device Addresses". This field is particular important for emergency dialing, and is a part of upcoming regulations regarding VoIP and e911 services. Device addresses are primarily used in e911 alerts that can be sent from the platform and can be used to help coordinate emergency responders to the proper location of an emergency. e911 alerts can be configured to send to any administrator, user, or email address who is responsible for helping coordinate a response to an emergency.
Please Note: Address information sent directly to emergency responders via the PSAP (Public Safety Answering Point) will be controlled and sent by your Voice Service or SIP Trunk Provider. The Kerauno UCaaS Platform has no control over the sending of this information. The address information and e911 alerts described in this article will only send an email to personnel responsible for helping coordinate e911 response.
There are two steps to enable e911 and device addresses. 1) Adding Device Addresses and assigning devices to them and 2.) Enabling e911 Alerts
Setting up a New Device Address
As a Kerauno administrator, navigate to the Users & Devices > Device Addresses menu. If you don't see this option, check to make sure you are on Kerauno UCaaS version 2020.04.1 or above, and ensure that you have permissions to this menu under the Users & Devices > Permissions menu.
Upon selecting the Device Addresses menu, you will be prompted with a list of previously configured addresses. You can select an existing address to edit it (Note: this will also change the address of any devices configured to the modified address) or select "+Add Device Addresses" to create a new address.
Upon selecting the "Create Device Addresses" button, you will be shown a form to input additional address information as shown below.

These fields are as follows:
- Name: A friendly name used to identify an address within other areas of the Kerauno UCaaS platform. This should be something that is easily recognizable.
- Dispatchable Location: A dispatchable location gives the option to be as specific as possible for potential emergency reponders. This field, along with the rest of the address, will appear in any e911 notifications sent from the system. Dispatchable locations allow users the option to be more specific in their entry at a particular address. As an example, a dispatchable location may be a specific floor of the building, a specific wing or physical area at the address, or a certain building at a larger campus environment.
- Address Line 1: The first line of an address, typically a street number and name.
- Address Line 2: The second line of an address, typically an unit number, or suite number.
- City, State, Zip: The City, State, and Zip Code of the device address.
- Country: The country where the device resides.
Once completed, selecting "Create Device Address" will create the new address in the Kerauno UCaaS platform and allow devices to be assigned to that address.
Configuring Devices to Use a Device Address
After setting up any address in the system, devices must be assigned to that address. There are two ways to accomplish this, either: 1.) By setting a default device location (which will take effect for any newly added system devices) or 2.) adding an address to each device individually.
Setting a Default Device Address
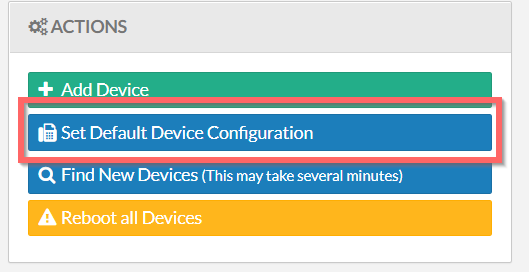
To set a default device address for any new device that registers with the Kerauno UCaaS platform, navigate to the Users & Devices > Devices menu and select the option to "Set Default Device Configuration".

After navigating to the "Default Device Configuration" page, a default location for every new device can be set. The list of available device addresses only shows those addresses that have been built under the Users & Devices > Device Addresses menu. To change the default device address, click the "Select Location" box and select a device address from the available list. Please note you do have the ability to set the default device location as "Unselected" meaning that the device address will be blank whenever a new handset comes up on the platform, and must be set manually on a per device basis.
If an organization only has one location, and is setting up this functionality for the first time, there is an option to "Force Device Setting", which means that all existing devices that the system is aware of will be configured to use this address.
Configuring a Device Address for an Individual Handset
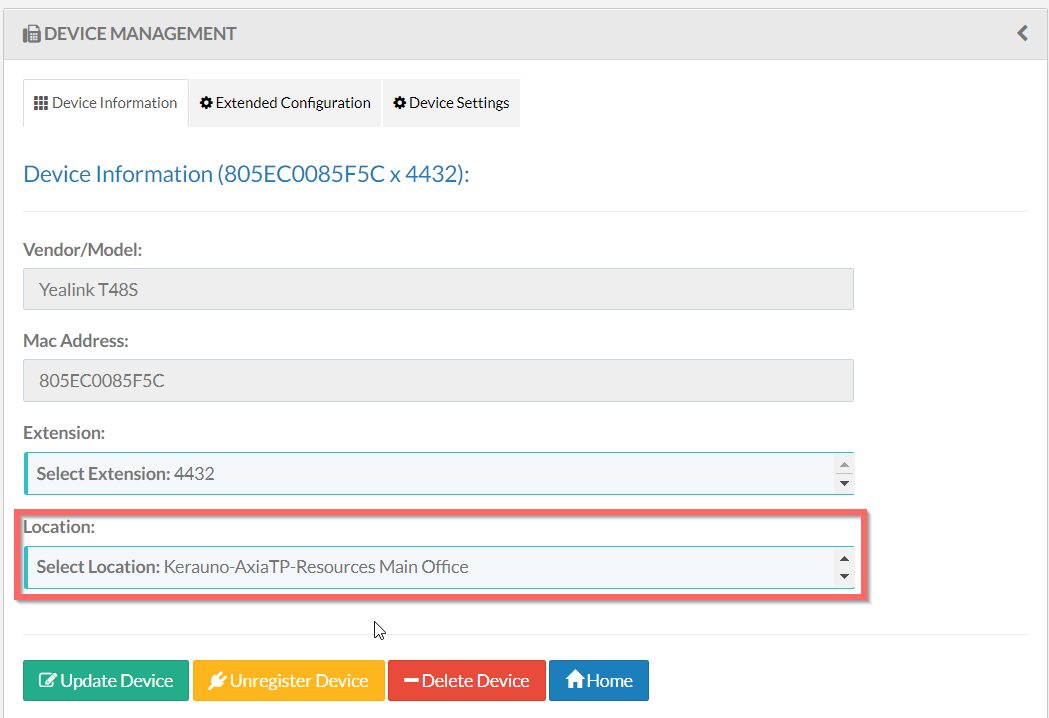
To set a device address for an individual location, navigate to the Users & Devices > Devices menu and select a specific device. On the "Device Information" tab, you'll find an additional field at the bottom of the form for "Location" as shown in the example below.

Clicking within the "Select Location" box will allow a device address to be set. Any changes to the "Location" are effectively immediately and a reboot is not needed for this change to take effect.
Enabling e911 Alerts
To enable e911 Alerts, navigate to the the System Settings > Email & System Alerting menu. Under the "Alerts" tab, the first alert shown will be for 911 Alerts. These alerts trigger at the beginning and the end of every 911 call that is made from the platform.
All alerts can be sent to an email, or list of emails as shown below. e911 alerts are enabled by default and can be configured by entering the list of desired recipients under the "Email Address" field. More than one address can be added by clicking the + sign and typing another email address.

Example 911 Alert
Once configured, any 911 call will trigger an email alert to the recipients. The example format of those emails is shown below.
Example Email Below (Note: Any 911 emails will send as a high priority)
-----
From: Alerts@platform.kerauno.io
Subject: Kerauno Platform Alert - 911 (Call Started) Alert
Date/Time: 2020-03-31 11:17:51
Extension: Joe Bloggs (1001)
CallerID: 317-555-1234
Dispatchable Location: 1st Floor
Full Address: Main Office, Main street, 200, New York, 1000011, NY, USA
Destination: 911
Duration: 00:00:11
