Workflow Forms allow businesses to dynamically collect or update information in the call workflow within Presence.
To add a Workflow Form to a user's Presence Dashboard, first navigate to Presence by logging into Kerauno and selecting the Presence option from the navigation bar at the top of the User Panel as shown in Figure 01 below.
 Figure 01: Presence Option in Kerauno
After selecting the Presence option from the dashboard, the Presence application will be displayed when loaded. Please note that the Workflow Form widget can be added both as a "panel" within an existing dashboard, or as its own dedicated dashboard.
| NOTE: | It is recommended that you add the Workflow Form as its own dedicated Dashboard to increase text size and improve usability. |
Adding a Workflow Form as a New Dashboard
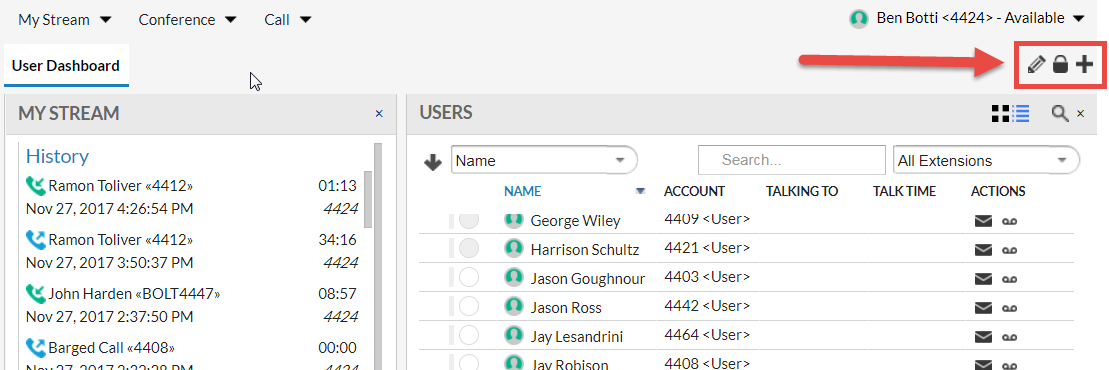
First, begin by adding a new Dashboard to Kerauno Presence. To do this, select the![]() icon in the upper-right corner of the Presence application as shown in Figure 02 below. The default dashboard name upon creation is “Dashboard 1” (the number increases as more dashboards are created). After creation, the dashboard name can be modified by selecting the
icon in the upper-right corner of the Presence application as shown in Figure 02 below. The default dashboard name upon creation is “Dashboard 1” (the number increases as more dashboards are created). After creation, the dashboard name can be modified by selecting the![]() icon, entering the desired name (Example: WorkFlow Dashboard), and clicking OK. The newly created dashboard will, by default, have one panel in which the Workflow Forms widget can be added.
icon, entering the desired name (Example: WorkFlow Dashboard), and clicking OK. The newly created dashboard will, by default, have one panel in which the Workflow Forms widget can be added.
 Figure 02: User Dashboard
Adding the Workflow Form Widget to a Dashboard
The following method can be used to add the new Workflow Form widget to an existing or new dashboard. The Workflow Form tool utilizes the CRM widget within Presence to show and display relevant information. Adding the CRM widget to a dashboard is the first step in utilizing the Workflow Form tool.
To do this, first select the![]() on an existing or new dashboard. This page will open a dialogue in which you will be asked to select a specific type of widget to add to the dashboard. Select the Customer
Management option from the sidebar, then select Add to Dashboard as shown in Figure 03 below.
on an existing or new dashboard. This page will open a dialogue in which you will be asked to select a specific type of widget to add to the dashboard. Select the Customer
Management option from the sidebar, then select Add to Dashboard as shown in Figure 03 below.
 Figure 03: Adding Customer Management Widget
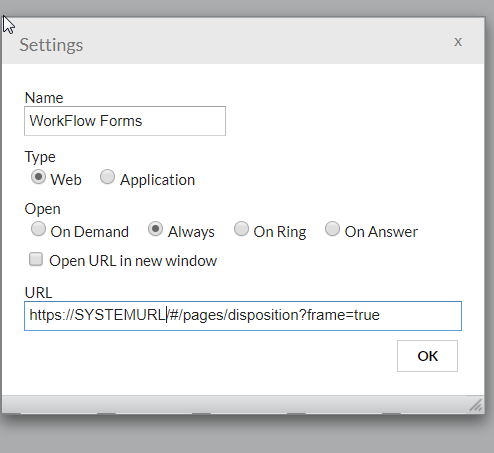
After selecting Add to Dashboard, a configuration screen displays that can be used to show the appropriate Workflow Forms information. Configure this pop-up as shown in Figure 04 below. If you leave this menu accidentally, it can be re-accessed by selecting the![]() icon in the upper-right corner of the dashboard.
icon in the upper-right corner of the dashboard.
URL Example: If system URL is abccompany.ntegrated.com, URL entered will be http://abccompany.ntegrated.com/#/pages/disposition?frame=true. |
|
| NOTE: | Don’t forget to enter either http:// or https:// in front of the entered system name in the URL. |
| If the setup is successful, you should see the panel filled with a screen similar to Figure 05 on the right. This form will change based on the types of calls being received and will allow users to start taking full advantage of Workflow Form functionality. |
|


