The Number Manager is where all telephone numbers that are pointing to Kerauno must be built and provisioned. Any telephone number that needs to make inbound and outbound calls must be built in the Number Manager.
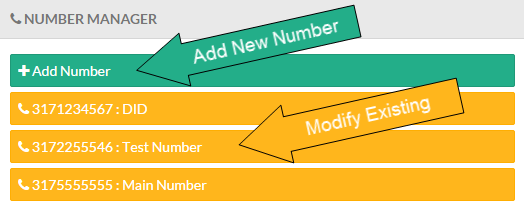
To add new numbers to the Kerauno system, navigate to the Number Manager modules under System Admin -> Number Manager. To add a new single number or large block of sequential numbers to Kerauno, click the green Add Number button on the far right side of the screen; to modify the trunk or configuration for an existing number, select the number from the yellow boxes under the Number Manager menu.
 Figure 01: Number Manager Menu
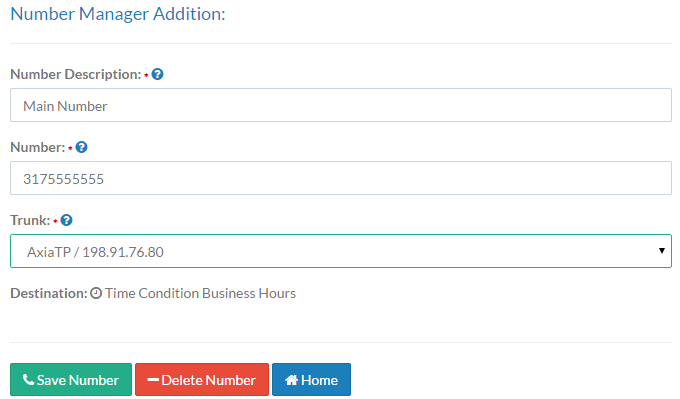
After selecting a number to add or modify, the Number Manager Addition screen is displayed. In this screen administrators can assign the number to be added, add a description, and specify a desired trunk. The options on the Number Manager Addition page are displayed in Figure 02 below.
 Figure 02: Number Manager Addition Screen
Number Description
In this field, enter a description of the phone number so that it may be easily identified. For example, Main BTN Line or Toll-Free Sales Number.
Number
Enter the 10-digit telephone number to add to Kerauno for inbound and outbound calls. Do not use parentheses, spaces, or dashes in the number. Correct: 3175555555 Incorrect: 317-555-5555.
 Figure 03: Number Manager - Entering Number
Also note that in this field, a large bulk block of numbers may be added. To do this, begin by typing two 10-digit numbers separated by a hyphen in the format startnumber-endnumber.
For example, typing 3175552000-3175552100 into the Number field creates 100 consecutive entries in that particular range (3175552000, 3175552001, etc.). All 100 numbers will be added as individual entries in the Number Manager after selecting the Add XXX Numbers to Manager button.
Trunk
Set the trunk that this number is assigned to for inbound traffic. This value must be set for reporting accuracy in the Trunk Analytics report. If it is set as "Unselected" calls to this number will function as normal, but there will be no record of which trunk the call used.
Destination
The Destination field shows where the number is currently routed to in the phone system. This information is created, managed, and modified from either the Call Flow Tool or the Users > DID/CallerID tab (for Direct Dial Numbers). All newly added numbers will display a destination of "Terminate Call." Calls to newly built numbers will result in a terminated call until the number is set up either as a User DID or built into the Call Flow Tool. For more information on Call Routing and Call Flow Tools, please refer to Call Routing in this knowledge base.
When finished, select the Save Number (Existing) or Add Number (New) button at the bottom of the screen to save changes. Kerauno will then return to the Number Manager menu.
Delete Existing Numbers
To delete a number from Kerauno, go the Number Manager menu under System Admin > Number Manager. Click the number to delete from the menu on the right as shown in the Figure 04 below.
 Figure 04: Number Manager - Delete Number
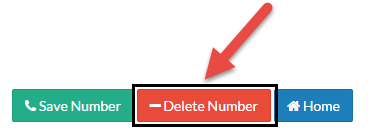
On the following screen, click the Delete Number button at the bottom of the page to remove the number from Kerauno. The administrator will be presented with a confirmation that the number will be deleted. When prompted, press OK to confirm the deletion of the number. Kerauno will return to the Number Manager menu and the number will be removed from the system.
 Figure 05: Number Manager - Delete Number Button
