The Restore menu allows administrators to restore Kerauno to a previous state from a backup file. Administrators may restore using a backup file that is on the local hard drive of the Kerauno server, or they may upload a new tar.gz file pulled from a remote destination.
Restore from a Local Backup
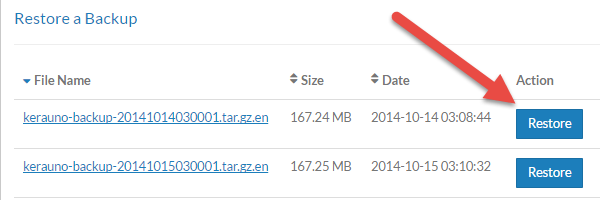
On the Restore tab, click the Restore button next to the backup that you would like to restore as shown in the figure below. Take particular note of the Date field, to ensure that the desired backup is chosen. Administrators may choose any of the local backups from the last seven days to restore from.
 Figure 01: Restore a Backup
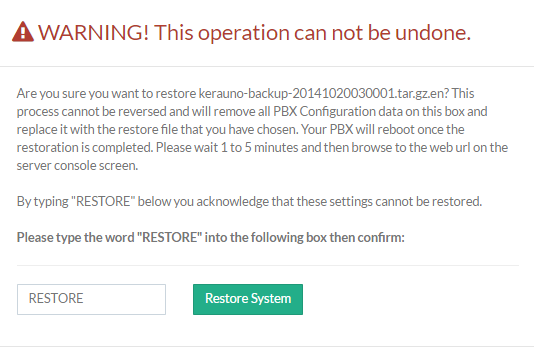
| After selecting a backup file to restore from, Kerauno presents the administrator with a confirmation page. Please read this page carefully, as it contains important details about the backup/restore process. To complete the restore, type RESTORE (all caps) into the box and click the Restore System button. |
|
Kerauno will reboot once the restoration is complete. Please wait 5-10 minutes and then refresh your browser and navigate to the Kerauno URL. This 5-10 minute window does affect service; the system will not be able to take calls during this time. After logging back in, Kerauno is restored from the selected backup and all call detail records, voicemails, and configuration settings are reset to the time/date of the selected backup file.
Restore from an Uploaded Backup
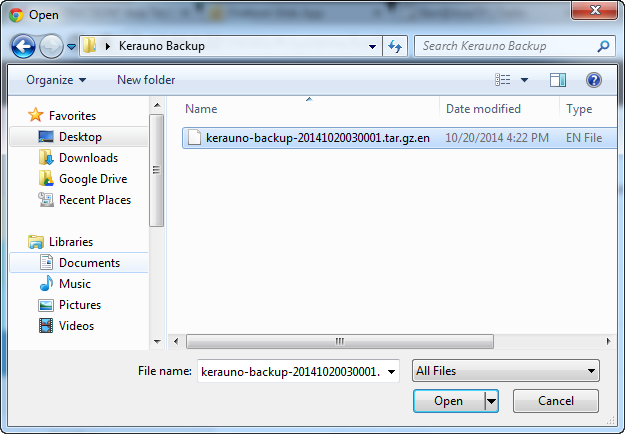
To restore from an uploaded backup file (such as a file stored at a remote destination) click the Choose File button on the Restore tab. An explorer window will open allowing administrators to select which backup file to use as the basis for the restore. Navigate to the folder/subfolder where the desired backup is located, select the desired backup file, and click Open or OK.
 Figure 03: Uploaded File Restoration - Open Window
Once the file is selected, click the Upload button (as shown in Figure 04 below) to begin uploading the file.
 Figure 04: Upload a Backup - Selected File
Depending on the bandwidth of the connection to Kerauno and the size of the backup file, this process may take 30 minutes or more. There will be no effect on PBX functionality while this upload occurs. Kerauno will test the upload file to ensure it is a valid tar.gz.en backup file. Once confirmed, the file will be placed in the list of local backups.
To restore from the newly uploaded backup, click the Restore button next to the file name of the recently uploaded backup file as shown in Figure 01 above. Confirm the restore according to the instructions detailed above in the Restore from a Local Backup section. Kerauno will reboot once the restoration is complete (it takes approximately 5-10 minutes to reboot and restore from the uploaded backup). This 5-10 minute window does affect service; the system will not be able to take calls during this time.

