The Trunks menu displays all information about the trunks configured for use with Kerauno. This list displays trunks currently being used as well as information about each specific trunk.
On this menu, the names of any trunks connected to Kerauno are listed, as well as the trunk type. The originating IP Address of the trunk as well as its current status (reachable or unreachable) is also shown.
 Figure 01: Trunks Menu
Configuring a New SIP Trunk
To configure a new SIP Trunk to work with Kerauno, first click the Add New SIP Trunk button on the bottom-right hand side of the Trunk menu.
 Figure 01: Trunk Menu
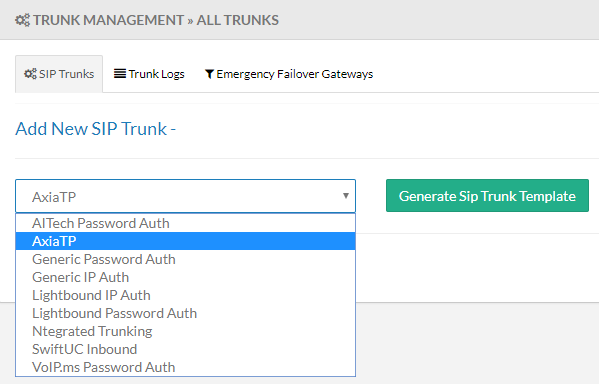
The Add New SIP Trunk tab is displayed. Click the drop-down to display a list of SIP trunk types. Select the type of SIP trunk to add to the system.
 Figure 02: Trunk Management - Add New SIP Trunk
There are currently two types of SIP trunk templates (Password and IP Authentication), as well as a number of additional templates that are specific to SIP service providers. If attempting to use a provider not included in the drop-down menu, select the Generic Password Auth or Generic IP Auth options.
After selecting either a generic or provider-specific option, click the Generate SIP Trunk Template button.
| NOTE: | If a Generic Password or IP Auth trunk is configured but still unreachable, please contact your AxiaTP Implementation Specialist or Project Manager. Some SIP providers have very specific requirements for trunk configurations such as specific codecs or dial plans. These options must be configured by an AxiaTP engineer. |
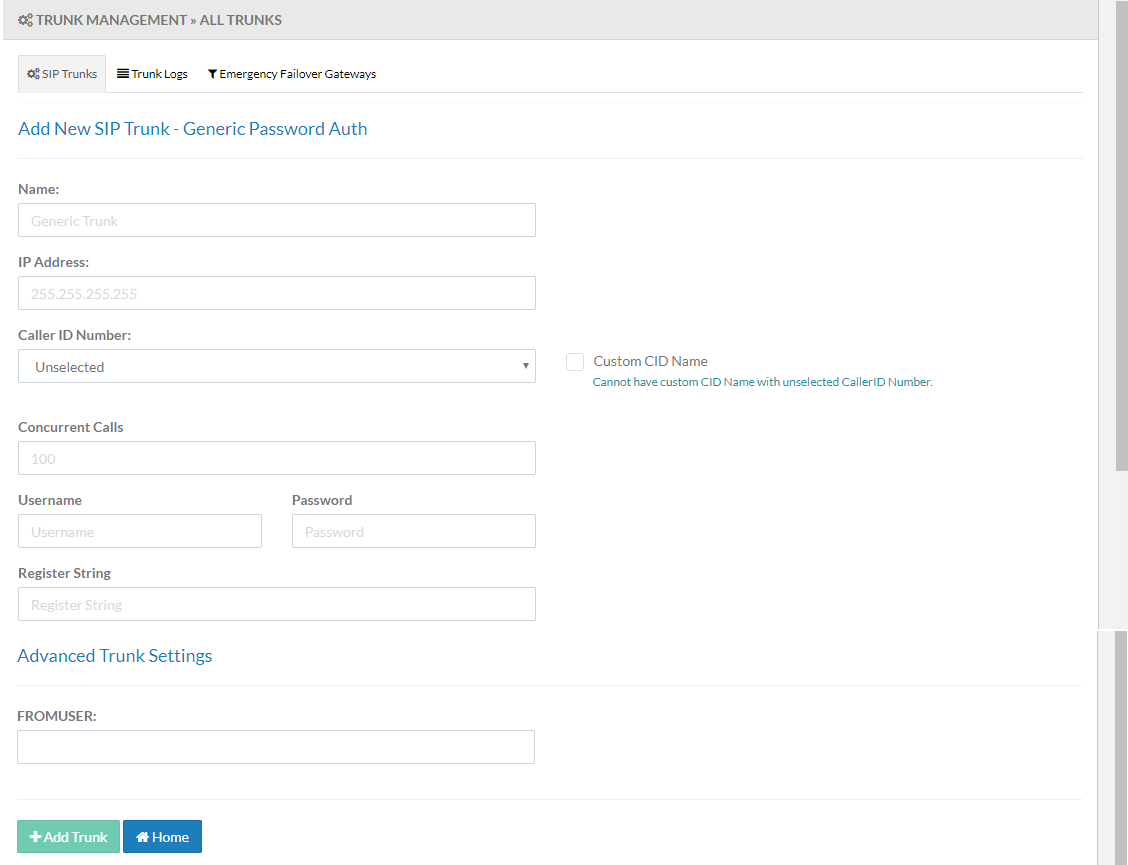
On the next Add New SIP Trunk screen, details may be entered to properly configure the SIP Trunk.
| NOTE: | Fields may or may not be included depending on which trunk type has been selected (IP Auth, Password Auth, or provider-specific). |
 Figure 03: SIP Trunk Configuration Form
Fields and Descriptions include:
Name: The name for the trunk being built. The value entered will show next to the trunk on the Status page so that the trunk may be easily identified.
IP Address: The source IP address of the SIP trunk that is being used. This value will not show if a specific provider was selected, as the IP address is already included in the trunk template.
Caller ID Number: The Caller ID to use for this trunk. This value will be set as the Trunk Default caller ID. If no specific caller ID has been set for an Extension or Dial Plan, the value entered here will be used.
Custom CID:
Concurrent Calls: Concurrent call limit set for the particular trunk. Any additional calls above this limit will receive a busy signal.
| NOTE: | Concurrent call limits may also be set by your SIP trunk provider. Please check with you SIP vendor to determine the maximum amount of calls that can be active at the same time. |
The following three fields are available for Password Auth trunks.
Username: Enter the SIP username. This is typically the primary telephone number on file with your SIP provider.
Password: Enter the SIP password associated with your SIP trunk. This information can be obtained from the SIP trunking provider.
Register String: Enter a registration string to pass to the SIP trunk. This information can be obtained from the SIP trunking provider.
Once all information has been entered, press the Add Trunk button. Kerauno will register and configure the trunk and return to the main SIP Trunks screen. If the trunk displays as Reachable, it has been added successfully.
