Registering Phones
Last Modified on 01/02/2020 12:36 pm EST
If the phones were not registered during the initial installer/turn-up process, please follow the instructions below to configure the phones to work with Kerauno.
Registering IP Phones
- DHCP must be enabled and must be able to provide an IP address, subnet, and default gateway to a device. If you are not sure if you have DHCP running on your LAN, please contact your IT vendor.
- Enable DHCP Option 66 (Boot Server Host Name) and configure the option value to the IP address of Kerauno. This value points the phones to the Kerauno address and then downloads the compatible .cfg file and firmware version from the server.
- Plug in all of the IP phones. If phones were previously connected to a legacy phone system or VLAN, they may need to be factory reset in order to obtain the new firmware files.
- Wait a few minutes while the phones reboot. This time varies depending on bandwidth available and the number of phones being configured (average firmware/cfg file size is ~5Mb). Once the phones have downloaded the firmware and connected to Kerauno, extensions may now be assigned.
- To assign an extension to an IP phone, simply dial *611. This code will the run the Kerauno AutoExEC (Device Configuration) program.
- When prompted, enter the desired extension number for the phone.
- The phone will reboot and restart with the new assigned extension.
Registering Softphones
- To register a softphone, first build the user and extension. If registering the softphone as a 2nd extension for a user, build it first under the Extensions tab for that user's account as detailed on page 160
- Go to the Users menu and select the desired user from the menu on the right.
- After selecting the desired user go to the Extensions tab for that particular user.
- Select the blue
 symbol next to the extension you'd like to register the softphone to as shown in Figure 01 below. symbol next to the extension you'd like to register the softphone to as shown in Figure 01 below.
 Figure 01: Extension tab of the Users Menu Figure 01: Extension tab of the Users Menu
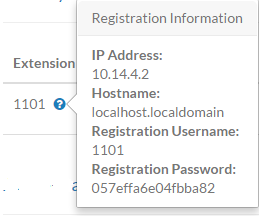
- The IP Address, Hostname, Registration Username, and Registration Password for this particular extension are listed in the pop-up.
 Figure 02: Phone Registration Information Figure 02: Phone Registration Information
- Enter this information into your softphone client along with the Hostname where your Kerauno instance resides (e.g., Testcompany.kerauno.com). The softphone is now registered.
|
NOTE:
| If you are attempting to register an IP or softphone for any Kerauno user outside of your network (for example, a remote employee utilizing their home internet connection), you must be sure to add their public IP address to the Kerauno Firewall tool. The firewall tool is located under Systems Settings > Network & Firewall.
|


